Old Terrain System (pre 0.4)
This subsystem is obsolete since RoR version 0.4.0. It was based upon Ogre engine's TerrainManager component, which was obsoleted, and thus we couldn't rely on it anymore.
File type overview
- .terrn - You define terrain name, associated .cfg name, spawn point position, ambient colour and various object positions.
- .cfg - You define Terrain Texture, RAW Heightmap file, World Sizes and Height, Tiles the map get divided into, Terrain LOD and additional stuff.
- .RAW - A greyscale image which is the heightmap of the terrain. It is a RAW 8/16 bit DEM (digital elevation map). Its dimensions MUST BE squared sized and with size (2^n) + 1, in example 1025x1025. As a consequence, the total file size must be 2,101,250 bytes (2x1025x1025). Other elevation sized maps could be: 129x129, 513x513, 2049x2049
- .os - Caelum Config
- .png/./jpg/.dds - Terrain Texture, typically a large bitmap (for example a 1024x1024 BMP) that is projected onto the terrain. This texture must include shading and shadowing (the terrain is not shaded by RoR). The light source (the sun) heading is -60 degree and altitude of 25 degree.
- .png/./jpg/.dds - A miniature map: a 256x256 image (that can be the reduction of the texture file) used as a map in RoR.
The .terrn format
Basics
The .terrn file is a text file containing the following information, in this precise order:
- Name of the terrain: it must be the first line of the file!
- Name of the .cfg file associated to the terrain (must be the second)
- (optional) If you want water in the terrain, put the character 'w' followed by the water height relative to the lowest point of your terrain. For example:
- (optional) For Caelum lighted terrains, add a line here with the text "Caelum". A Caelum-lighted terrain is a terrain that has 12 extra textures to have the mountain shadows match with the sun position.
- Sky color: red, green, blue components (between 0 and 1)
-
Spawning positions: a set of two or three X,Y,Z coordinates.
- The first coordinate is the truck spawn position (when buying a new truck)
- The second is the initial camera spawn position
- (optional) The third is the initial character spawn position.
-
(optional)
sandstormcubemap Sky/EarlyMorningcube map used on this terrain. Example at 0.36 version in aspen. -
A set of lines, each line positioning an object or a truck on the terrain. At this stage, you can put comments by starting the line with "//".
-
The content of the line is:
X, Y, Z, RX, RY, RZ, object_name- The values X,Y,Z are the position of the object
- RX,RY,RZ the rotation of the object
- The object_name is the name of an .odef file, but without its file extension
-
You can add more optional parameters to add labels to the map:
- The first extra parameter is a qualifier (village, hotel, observatory, etc.)
- The second is the place name. If you want to put a truck or load in the map, use the keyword "truck" or "load" in place of the object_name, and put the truck or load name after (with the extension).
-
-
The keyword "end"
NOTE: If you add truckshop, hangar, marina or any building you can buy vehicles, the section 8-2 is required!
Examples: A terrn file in its simplest form:
Angle
angle.cfg
0.93, 0.86, 0.76
509,6,680,  509,6,680
end
A more complex terrn file, with water and a few objects (using 8-2 section):
North St Helens
nhelens.cfg
w 33
0.93, 0.86, 0.76
1169.0,35,948.75,  1220,36,980, 1165.5, 35, 942
//a truck
1190, 35, 930, 0, 0, 0, truck   wrecker.truck
//a load
1130, 35, 910, 0, 0, 0, load    acontainer.load
//an object
1180, 34.15, 950, 0, 20, 0, truckshop shop Rig-a-Deal
1220, 34.15, 980, 0, 20, 0, truckshop shop Rig-a-Deal-2
1280, 34.15, 960, 0, 20, 0, load-spawner sale spawn_Zone_1
1310, 34.15, 950, 0, 20, 0, load-spawner sale spawn_Zone_2
1390, 34.15, 950, 0, 20, 0, myhangar2 repair Repair_Zone_1
end
Author information
Append something like this inside your file:
//author terrain 4 pricorde
//author objects 4 pricorde
Do not forget the '//' !
Grass
This enables you to add grass to the terrain. The arguments are (all on one line!):
| Keyword | Description | Recommended Values |
|---|---|---|
| grass | Must precede other grass-related keywords | |
| Grass Range | Determines grass visibility range in meters | 80 |
| Sway Speed | The rate at which the grass sways in simulated wind | 0.5 |
| Sway Length | Length of sway displacement | 0.05 |
| Sway Distribution | How much of the wind wave is distributed | 10 |
| Density | Density of grass distribution. Maximum of 3.5 | 0.3 |
| MinX/Y MaxX/Y | Determine size of grass: 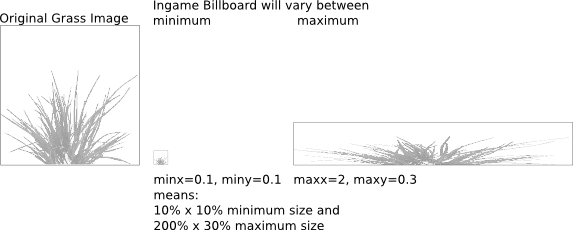 | |
| Fade Type | Adjusts method of transition (via distance): 0 - FADETECH_GROW = Grass will grow out of the ground, looks good with grass that has ground color 1 - FADETECH_ALPHAGROW = Like 0, but with alpha blending 2 - FADETECH_ALPHA = Alpha blends in/out | 0 |
| Min-Y Max-Y | Minimum/maximum appearance level. 0 for no minimum/maximum. Example: 0, 10 for seagrass under the water level 10 or 10, 0 for grass above the sea level (if the sea level is 10) | |
| Material | Material file for grass appearance | Listed in /data/paged/grass.material |
| Color Map | Determines grass color. Grass image must be gray scale! Use none to disable | Use terrain texture to match ground color |
| Density Map | A gray scale image that determines density. Darker shades refer to less grass, while white refers to most grass. None to disable. |
For example 7 grass types plus sea grass (water level is 10):
// format: grass range, SwaySpeed, SwayLength, SwayDistribution, Density, minx, miny, maxx, maxy, fadetype, minY, maxY, material colormap densitymap
grass 200, 0.5, 0.05, 10, 0.1, 0.2, 0.2, 1, 1, 1, 0, 9, seaweed none none
grass 200, 0.5, 0.05, 10, 0.3, 0.2, 0.2, 1, 1, 1, 10, 0, grass1 aspen.jpg aspen_grass_density.png
grass 200, 0.5, 0.05, 10, 0.3, 0.2, 0.2, 1, 1, 1, 10, 0, grass2 aspen.jpg aspen_grass_density.png
grass 200, 0.5, 0.05, 10, 0.3, 0.2, 0.2, 1, 1, 1, 10, 0, grass3 aspen.jpg aspen_grass_density.png
grass 200, 0.5, 0.05, 10, 0.3, 0.2, 0.2, 1, 1, 1, 10, 0, grass4 aspen.jpg aspen_grass_density.png
grass 200, 0.5, 0.05, 10, 0.3, 0.2, 0.2, 1, 1, 1, 10, 0, grass5 aspen.jpg aspen_grass_density.png
grass 200, 0.5, 0.05, 10, 0.3, 0.2, 0.2, 1, 1, 1, 10, 0, grass6 aspen.jpg aspen_grass_density.png
grass 200, 0.5, 0.05, 10, 3.3, 0.2, 0.2, 1, 1, 1, 10, 0, grass7 aspen.jpg aspen_grass_density.png
Trees
//trees yawFrom, yawTo, scaleFrom, scaleTo, highDensity, distance1, distance2, meshName colormap densitymap
trees 0, 360, 0.1, 0.12, 2, 60, 3000, fir05_30.mesh aspen-test.dds aspen_grass_density2.png
trees 0, 360, 1, 3, 1, 60, 3000, tree.mesh aspen-test.dds aspen_grass_density2.png
trees 0, 360, 1, 2, 1, 60, 3000, tree2.mesh aspen-test.dds aspen_grass_density2.png
trees 0, 360, 0.1, 0.13, 1, 60, 3000, fir06_30.mesh aspen-test.dds aspen_grass_density2.png
trees 0, 360, 0.1, 0.13, 1, 60, 3000, fir14_25.mesh aspen-test.dds aspen_grass_density2.png
trees 0, 360, 0.1, 0.2, 3, 60, 3000, plant1.mesh aspen-test.dds aspen_grass_density.png
trees 0, 360, 0.1, 0.2, 3, 60, 3000, plant2.mesh aspen-test.dds aspen_grass_density2.png
arguments:
- yawFrom-yawTo: that is the range which the game will choose to randomly rotate the trees
- scaleFrom-scaleTo: scaling range that the game uses randomly. 0=0%, 1=100%
- highDensity : density factor: 0=0, 1=not much, 2=more, etc
- distance1: distance to which the game should use the mesh instead of the billboard. This is performance critical, use low values if possible!
- distance2: distance to which the billboard should be drawn (max sight range)
- meshName : the mesh to use
- colorMap : used to colorize the mesh. if your mesh is too dark check the colormap! Can be set to none to disable it.
- densityMap: texture that determines where and how much trees are used. white = 100%, black = 0%
since 0.38.62 it has two more arguments:
- grid spacing (0=default):
- negative number: set the detail level of the used grid
- positive number: use new tree distribution scheme: one tree in the center of a grid cell
- collision mesh: .mesh that will be used for the collision engine
Races
It's no longer possible to add races to your terrain using the terrn file. You'll need a separate script file. More information can be found here: Race script generator
Procedural Roads
begin_procedural_roads
//position x,y,z rotation rx,ry,rz, width, border width, border height, type
           0,0,0,         0,0,0,    10.0,  0,            0,             flat
           0,0,0,         0,0,0,    10.0,  0.25,         1.0,           both
end_procedural_roads
valid types:
- flat
- left - Only left border
- right - Only right border
- both - Both borders
- bridge
-
bridge_no_pillars
-
monorail (0.35+)
- monorail2 (0.35+)
You can view some examples of various settings
Mpspawn
Mpspawn is used for spawning boats and airplanes on multiplayer. The syntax is
mpspawn airplane 2192.29 16.3357 1963.89 0 260 0 mpspawn boat 1741.8 5.58322 2291.23 0 68,091 0
The line starts with "mpspawn airplane" (for airplanes) or "mpspawn boat" (for boats)
The first three numbers are the X, Y and Z coordinates of the spawning point. The next three numbers are X rotation, Y rotation and Z rotation.
If these lines do not exist in the terrn code, the game will eventually crash or the vehicle will spawn at the standard spawning position
Caelum Sky
you can select which sky to use by adding a one-liner:
caelumconfig some_sky
the default is "ror_default_sky".
the sky must be defined in a .os file.
for example to use some_sky create a file "my_terrain_sky.os" and put beside your other terrain files and put the following into it:
caelum_sky_system some_sky
{
    // J2000
    julian_day 2451545.0
    time_scale 1

    point_starfield {
        magnitude_scale 2.51189
        mag0_pixel_size 16
        min_pixel_size 4
        max_pixel_size 6
    }

    manage_ambient_light true
    minimum_ambient_light 0.1 0.1 0.3

    manage_scene_fog yes
    ground_fog_density_multiplier 0.0015
    scene_fog_density_multiplier 0.0015

    sun {
        ambient_multiplier 1 0.5 0.5
        diffuse_multiplier 3 3 2.7
        specular_multiplier 5 5 5

        auto_disable_threshold 0.05
        auto_disable true
    }

    moon {
        ambient_multiplier 1 0.2 0.2
        diffuse_multiplier 1 1 .9
        specular_multiplier 1 1 1

        auto_disable_threshold 0.05
        auto_disable true
    }

    // Off by default
    /*
    depth_composer {
        debug_depth_render on
        haze_enabled no
        ground_fog_enabled no
        ground_fog_vertical_decay 0.06
        ground_fog_base_level 0
    }
    */


    sky_dome {
        haze_enabled yes
        sky_gradients_image EarthClearSky2.png
        atmosphere_depth_image AtmosphereDepth.png
    }

    cloud_system
    {
        cloud_layer
        {
            height 3000
            coverage 0.9
        }
    }

}
Gravity
You can change the gravity in your map by adding :
gravity -1.622
It will set the gravity of your map to the Moon one. 0 means no gravity (weightlessness). Positive value will repulse(push) you from the ground.
Some values :
- Earth gravity : -9.81 (default value if not precised)
- Moon gravity : -1.622
- Mars gravity : -3.711
- Pluto gravity : -0.665
Collision limits
if you have lots of objects, you might want to increase the collision buffer size so everything stays contractible. The default is 100000.
collision-tris 100000
Caution: use this before loading any objects (in the top of the file) Caution2: the more you specify here, the more memory will be required to run your map, which can be a reason why it stops working for some users.